Introduction

The purpose of this blog is for me to take all the information I learn about aquaponics (or a percentage) and put it to use. I figure that if I get it out into the open and publish it I will actually do something with it. As of right now it is only a theory but I have hopes in it becoming a reality. Over the last 15 years or so I have come across many things that have peeked my interests.. Including but not limited to electronics, Cars, Computers (much longer than 15 years) and anything technical. As of recent, I have begun broadening my horizon and have turned my passions to not only technical but other things such as aquaponics and building random things like desks etc. One day I hope to pursue the combination of all these things but sadly I'm not sure how it can happen :). I'm hoping to update every few days if not sooner. I spend a lot of time researching so I would really like to post each time I complete a session of research.. Good luck with that I tell myself but only time will tell.

Sunday, March 06, 2011

Building the stand for the grow bed

I woke up today determined to get some more work done. I picked up a 2"x8"x12' board the other day thinking that I already had my 2"x6"x12' board. I did not so I needed to pick one up today. I drove down to Home Depot and got it. I love the looks on their face when I pick it up.. I don't know why but it seems like they are just wondering what I could possibly want with that board. I bought it by itself. Ok fine onto the project. Here are the supplies I am using today.

     1 12' 2x6
     1 12' 2x8
     2 10' 2x4
     1 lb. 3" deck screws
     1 Dewalt Drill
     1 Framing Square
     1 SkilSaw
     1 Quick-Grip 546 Mini Bar Clamp ( Like a second person BIG HELP!)
     1 Philips bit for drill
     1 Set Saw Horse
      Safety Glasses
I want to reiterate that I am not an experienced wood worker but I am a computer geek so what you read next will probably be comical to most people.


I took the 2x6 and I place it into slots that were in the saw horse. This held up upright and I was able to lay the 2x8 directly on top of it at the edge. I used the bar clamp and it held up the 2x8 so I could screw it together without having to hold up all the weight of the board and so it didn't slide around. This worked beautifully.
 Here you can see the bar clamp.

I took this opportunity to test out my cordless drill again. As you probably guessed it was able to screw a total of 1 screw before it was out of juice to screw it all the way in. I quickly switched over to my corded dewalt drill. This board is going to be cut in 35" sections So I knew I should mark these lines first and then I knew not to screw on the lines. Genius I know... I used a screw about every foot just making sure that after the cuts that each section will have adequate screws to hold it together. 

Once I was done it was time to cut the sections (35" sections) Since I previously marked it I didn't think I needed to do it again. I was correct.. I grabbed my skilsaw and plugged it in. I lined up the blade to the line and cut through the first line like I was a pro. keep in my the section isn't free because I didn't cut through the 2x6 only the 2x8. I went to the next line and started to cut when all of the sudden the blade stopped moving. I was lost. Why wouldn't it cut through this part and it cut through the first. I tried and tried but i couldn't get the thing to cut. I said screw it for now and pulled out my jigsaw and worked it very hard and ended up cutting the rest this way. This is a horrible thing to do but I needed it cut. I finished cutting the 4 sections and I read the directions for the skilsaw for the second time and found out the optimal position of the depth gauge (I didn't know it had a depth gauge) Apparently the blade is supposed to go about 1" below the wood and by default it was going around 2"-4" below the board. I fixed this. Sorry I don't have pictures for the next step but I am sure you get the idea of what it looks like.

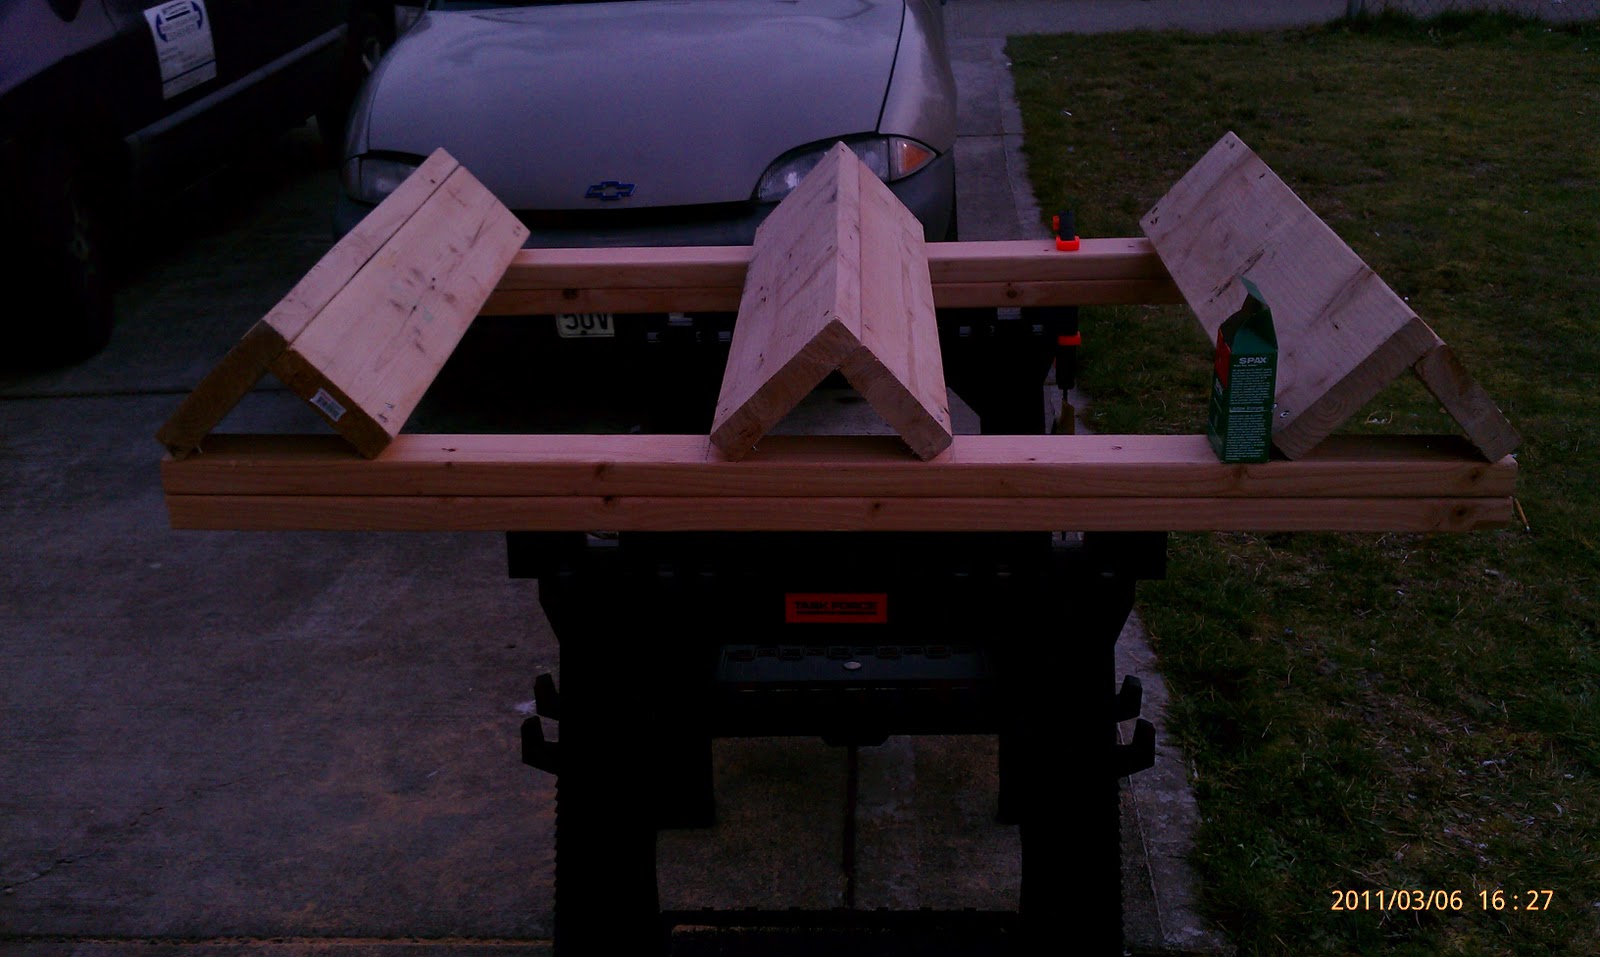
These are my pieces cut up. If you analyze this picture you will see that They aren't even probably has to do with my skill level. Is 0 a level?
My next set of instructions were to get 2 of the 2"x4"x10' boards and per directions screwed them together. I still don't understand why i wouldn't just use a 4x4 but I decided to follow directions just this one time. I only had 3" screws so I screwed in at an angle as to not puncture the other side. This board is supposed to be cut into 54 3/4" pieces so I don't think I had to worry about where I put my screws. I used my handy bar clamp again to ensure the boards didn't slip and I didn't have a problem. Now that I got the boards screwed together I decided to test my skilsaw again. It was like a butter knife going through hot butter. I was soo excited that this worked out. Unfortunately because it was soo thick I had to flip the board over and cut through the other side.

All I needed to do now is to take 3 of the sections I cut above and screw it at an angle to secure it to my newly created 4x4. It should look like this. Well that was enough work for the day. Talk to you later!!

Thursday, February 24, 2011

Long Time No See!! Time to start cutting!


I know it has been a while since I have posted but I just got the supplies and as of yesterday started to build. I currently am missing a few pieces but thats ok I will get them soon. I got off work yesterday and was being lazy sitting on the couch. I was about to fall asleep when I just decided I wanted to at least cut something up. I grabbed my first barrel out of the garage and started. Here is what I used:

1- Ryobi Jigsaw with a new blade
1 - 1" Spade Drill bit
1 - 1/2" drill Dewalt Drill
1 - 1/4" Cordless Ryobi Drill (i'll explain later why I have 2 listed)

1-  Plastic Barrel
1 - 3/4" PVC male adapter
1 - 3" long piece of 3/4" PVC pipe
1 - 3/4" PVC threaded ball valve
1 - 3/4" PVCstreet ell
1 - 3/4" conduit locknut
1 - Framing Square
1 - SAFETY GLASSES - Very Important
Plans - http://www.fastonline.org/images/manuals/Aquaculture/Aquaponic_Information/barrelponics_manual_email.pdf

The first thing I did was take my framing sqaure and measure and draw lines of where I was going to cut.
The plans have all the specifics I am not one to reinvent the wheel so I will just explain the basic of what I did and tell you the things that I either made a mistake on or if the plans were lacking on something. Because this was my first step of actually building my dream.. It was huge just to see the lines drawn. I used a dry erase marker.

I have never used a jigsaw before so I took it out of the box and immediately went for the manual. I wanted to make sure I used it the right way. It was very easy to put the blade in. All I had to do is push a yellow lever down all the way, slip the blade in and make sure it was in the guide properly. The first thing I did next is drill a hole big enough for the jigsaw blade to fit into as a starting hole. I then took my first leap into jigsawing and cut around the square. In the picture above it doesn't show the rounded corners I put on it. I thought it would be easier for me to do with the jigsaw. I started up and moved around my lines. I tried very hard to keep it going in the lines but I am not yet very good at controlling it.

You can see from the picture I did a pretty good job but not perfect. I also didn't clean out the barrel first because I figured it would be easier to clean with a big hole and a drain in it. This barrel had apple cider vinegar and surprisingly enough didn't smell bad as a I expected it to. Here is the jigsaw I used and it worked like a charm...

Now its time to take the barrel outside. I wasn't sure how messy the drill would be so i figured that outside would be the best place to take this. I got my cordless drill out and put in the 1" spade bit in it. I measured 1.5" from the bottom and drilled attempted to drill a 1" hole. Apparently my cordless drill can only drill air because as soon as I started to drill there just wasn't enough torque to finish the job. I pulled out my DEWALT DWD210G 10-Amp 1/2-Inch Pistol-Grip Drill and put the bit in it. I didn't realize how much torque this drill had until I started to drill. I ended up dropping it the first time :( but I knew I shouldn't do that again. I have never spent so much on a tool so i wanted to keep it in good condition. Luckily the hole didn't get messed up. To make my drain spout complete I took a 3/4" male adapter which is basicly is a tiny pvc adapter that has a threaded side and on the other is just an opening for a 3/4 pvc. The instructions say to use aquarium silicon but for now I am just putting the pieces together to use for a drain to clean it out. I am not going to seal anything till I am ready for final assembly. here is the step by step pictures of the drain assembly. This is also the part that the pump gets attached to.


This is the male adapter screwed into the hole I drilled.


I used my  PVC Cutter to cut 3" off so I could use it in my drain.


I installed a 3/4" street elbow which is an adapter that allows me to put another fitting on the end. The skinnier part makes it a street el. 


This is my completed drain with a ball valve. Keep in mind this is just to clean it. The final assembly will be done with the rest of the project. As you can see it is dark outside. I will be going back inside to clean the barrel now.


I put the barrel in my bathtub because it was soo late and I wanted to use hot water. I spent the next 30 minutes cleaning out the barrel.


Well I will see you next time!

Wednesday, February 02, 2011

The Design Stage - Part 1

I get excited more and more every day knowing that the fully functional version of my dream aquaponic system is just a couple weeks away. Its time for me to start physically planning my system. I have to decided its probably best to compose my art on  paper because it would take longer than 2 weeks just to figure out how to use Google Sketch-up which is what I started to design my system on. I have to measure the barrels I currently have (2) previously used food grade barrels that used to contain apple cider vinegar and I believe red wine vinegar. I purchased these barrels from a local guy. They are exactly like the barrely below. It doesn't matter where you get the barrel from as long as it is food grade and It did not have any deadly or non food friendly chemicals in it previously. Because I plan on modifying my design once I get a house I want to build my barrelponics version a little different. The most common design has a sump tank to the backside of the growbed above the growbed. I am going to have the sump tank on the ground next to the tank. I am going to use one of my barrels as the tank and the othe barrel cut in half and each side will be 1 growbed for a total of 2. Because of this design I will need 2 water pumps. One to pump the water into the grow bed and one to make sure the fish tank stays the same height. this is called Constant Height In Fish Tank CHIFT for short. And because there will be a Pump In the Sump tank it is called a PIST. So I will be building a CHIFT-PIST system. In order to make this system here is rough idea of what I will need.

1 - Barrel ( for sump tank - Keep in mind I could grown duckweed and other stuff in the sump tank)
PVC pipe used for plumbing with a various assortment of bends and T's.
2 - Water Pumps (1 for sump tank) and 1 to go to grow bed.
10 - Baby Rainbow Trout 
100 liters of Hydroton grow medium

Come to think of it.. This list doesn't see like its a lot.. but lets see what all it requires for assembly. I can't wait! See you tomorrow!


Tuesday, February 01, 2011

The Dreaming Stage

As it gets closer and closer to building day I find myself in this dreaming stage. I have over 100 hours of research  crammed in my in my brain. There are a few questions are still tumbling around up there.

  • What size tank should I use? 
  • What plants should I grow? 
  • What type of Aquaponics setup should I use? 
  • What grow medium should I use? 
  • What should I eat for dinner?  
For the next few posts I am going to locate and categorize my research and put together as much as I so that you understand the thought process as well as the physical building process. I also wanted to let you know that I added an aquaponic supply store to this blog. I have posted a few items I think will help you create your own aquaponics system but I will be fine tuning this store as I get more used to the products and see what I like and what I don't. This is exciting to me because I want you to be able to purchase exactly what I do so you can have the same successful system I do. You might make some changes and I am sure mine won't be the greatest of all time but one thing I know for sure. IT WILL WORK!! Thats what matters right? Good vegetables and yummy fish to eat. Sorry for the short post tonight but I plan on getting to the planning stages tomorrow so there will be plenty of content coming soon.

Monday, January 31, 2011

Aquaponics - Explained

In my first post I explained in a nutshell what this phenomenon called Aquaponics is. Well today I am going to go more in detail about the specifics on how it works.Just to refresh your memory I'll explain the basic once more. Aquaponics is a joining of aquaculture(fish) and hydroponics(growing plants in a soil-less environment). It is what   I consider to be the closest thing to actual organic that our society will ever get and I will explain this later. An Aquaponics system starts out with a fish tank which is normally placed on the floor due to weight and how drain systems are designed. This tank can be made up of anything. I have seen old food shipping containers used. They are made up of plastic with a metal cage and are about 300 gallons. I have seen 10 gallon fish tanks used. Regardless of what is used to hold the fish its whats inside that is treated like gold in the Aquaponics community. The type of fish is also up to you. What fits your needs? You have to take a lot of things into consideration also when deciding on what type of fish you will use. What type of environment works best for what fish. What temperature are you going to keep the tank at. I will have a fish guide up hopefully soon.Common fish species used are Tilapia, Rainbow Trout, Perch and many others. It doesn't matter what kind of fish you use but end result is the same. They all provide us with fish shit! The fish waste provides ammonia and nitrates which later on in the cycle will be converted to plant food. Above the tank is what is called the grow bed. It can be made up of just about anything. A lot of people use some sort of food rated plastic container. This bed used in many ways you can set the plants in their own trays in the water and basically let them float or you can fill the bed with some sort of grow medium. A few examples of grow mediums are Hydroton or coconut husks are both commonly used.
Since this is more of an overview I don't want to go into details  about which is better or worse and what not to use other than don't use soil. The fun thing about aquaponics is that the everything is versatile. You can design it however you want as long as the principle is the same. You decide how your going to get the fish waste to the plants and how you want to get the clean water from the plants back into the tank. You can use a continuous flow and have an overflow that goes back into the tank. You can have a normal drain and have a timer turn the pump from the tank on and off. You might even try to use a siphon pump and use science to create a drain that when the water gets to a certain point it drains automatically.The fun thing about this whole process is that if you have it setup right you will never have to clean the fish tank because the plants are the bio-filter. It is the only type of filter you can use. You can not use any chemicals in this system. If you use pesticides or some sort of chemicals in the water either your plants will die or your fish will die. So with a successful system comes the reasoning by my statement stating that this is the most organic food society is going to get. Thank you for making it this far and I look forward to providing you with all the information you will need to complete your own system.

Sunday, January 30, 2011

Aquaponics - Intro

Hey kids... This is my first page here on Blogger. I moved over from wordpress just because I love google and blogger will do me good. I am dedicating it to my research and implementation of aquaponics. I have been fascinated by this farming method for about a year now. It all started out by me thinking to myself "I really want a garden" but I know that in the renting life, finding a house/apartment with space for a garden is not only unlikely but it is also permanent. I am not a fan of working hard on something and then leaving it behind to someone else to take it over and most likely neglect it. I started my research by looking for blogs and such that focused on gardening indoors. My plan originally was to build a soil container on wheels so when I wanted to leave I could take it with me. That was a short lived thought as I came across Hydroponics. I have heard of this before but it is more associated with the less than legal growing of herbs, to put it lightly. Quickly I came across aquaponics, and just as quickly, my head exploded.. Mind raced.. adrenaline did its own form of rushing. A short explanation of what I just found as nothing short of amazing is this: A marriage of aquaculture and hydroponics. Fish need food and clean water in the simplest form. Plants need nutrient rich growing medium and sunlight. Here is where the magic happens. Fish waste is converted naturally to what plants need to grow. As this process occurs the water gets clean. Do you see where I am going with this? Now starts the journey of researching, building and maintaining a successful aquaponics system.